
Microsoft Azure – Adding Additional Public IP Addresses
Microsoft Azure is one of the big cloud providers, along with AWS (Amazon Web Services) and Google Cloud. The Azure services are incredibly comprehensive, and offer customizations of technology and service levels to suit anyone from the smallest of website operators to the largest of international corporations.
However, there is a learning curve to using any of these services, and to a novice, or someone unfamiliar with the various cloud interfaces, the complexity may seem somewhat overwhelming and confusing. One such common task, which may cause confusion or frustration, is adding an additional public IP address to your Azure virtual machine (VM).
The Scenario
So, in this case, we're going to imagine a Linux VM running CentOS and Apache, although it could equally be any version of Linux or any webserver. And, at the moment, we have a single public IP address which is shared between several of our websites. However, we now want to add an additional website (or modify an existing one) for which we wish to use an entirely separate public IP address. Thus we'll have more than one public IP on the same VM.
As you can imagine, this is completely do-able, and it's not really terribly complicated. But, of course, if this is the first time you've tried to do it and you don't know all the steps, then it can seem the most complicated thing ever.
First things First
Here's an overview of the steps that you'll need to follow. In fact there is another way of creating an IP too, but the method below is the easiest. These steps assume the Azure interface being used as of March 2022, which may change over time.
- Go to your Azure home page (https://portal.azure.com/#home)
- Select the Network Interfaces icon
- Click the network interface link, under the "Name" column
- Select IP Configurations from the menu which appears
- Click on "Add"
- Obtain and configure the IP
- Create an ethernet alias on one of your existing adapters
- Configure Apache (or whatever your webserver is) for the new IP address
- Relax, have a coffee. You're finished.
The first several of those steps should be quite straightforward, so the first image below will kick off from the point at which you've just clicked on the network interface link under the "Name" column. Here's what you should see (or something similar):
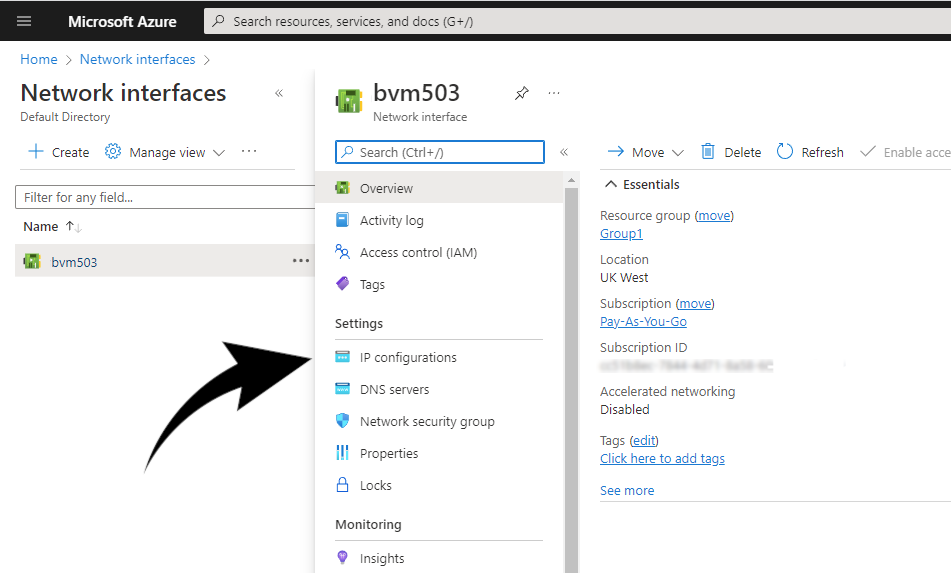
Azure IP Configuration
Now you should see the IP configurations link in the menu which appears. Select that link and you'll then see a screen similar to the one below:
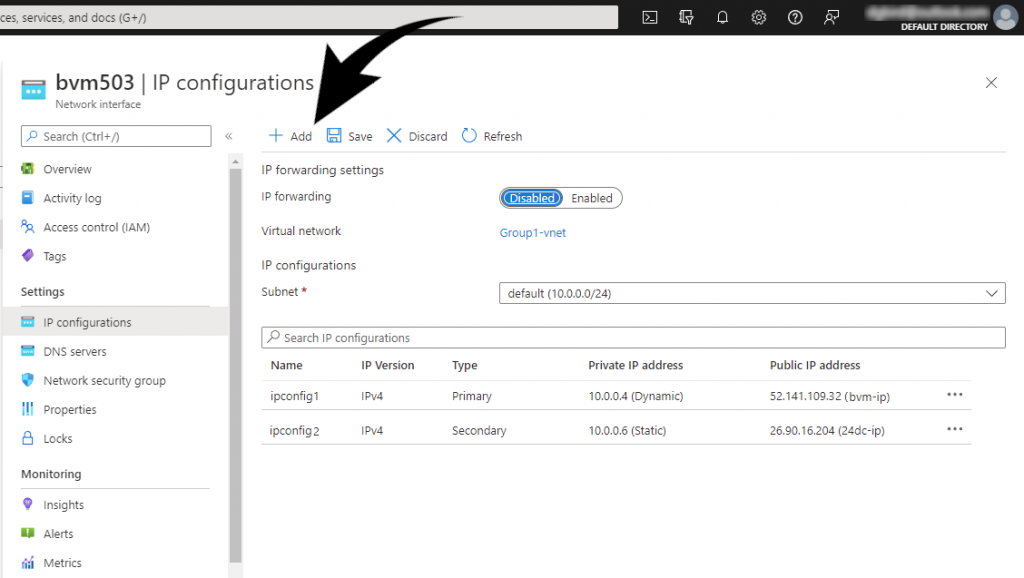
Azure Public IP Configuration
Now the fun bits begin. Here is where you'll actually obtain the new IP address. As noted previously, there is at least one other way of obtaining an additional public IP address in the Azure interface, but this method - for our present purposes at least - is the easiest.
So, now click on the "Add" link, as indicated in the image above, and you'll be magically transported to yet another set of options. This is where you actually get the new IP address. (see below). An explanation for each of the images is given after the third image.
First Image, of Add IP Configuration:
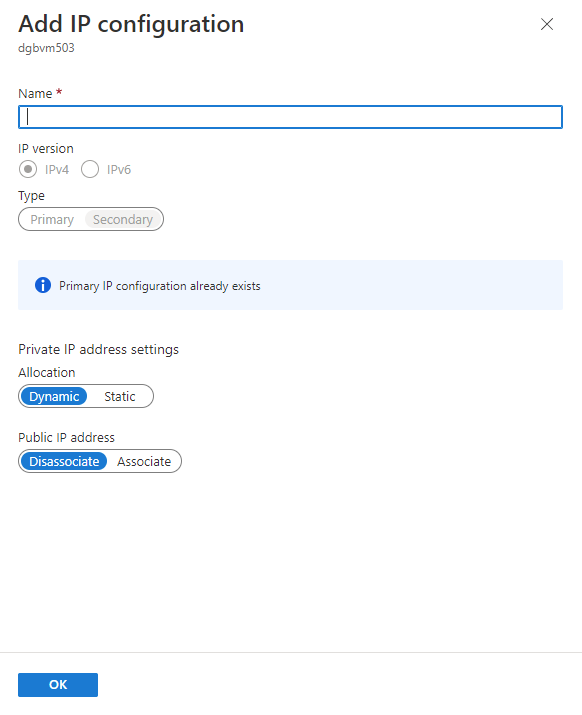
Azure - Additional Public IP
Second Image, of Add IP Configuration:
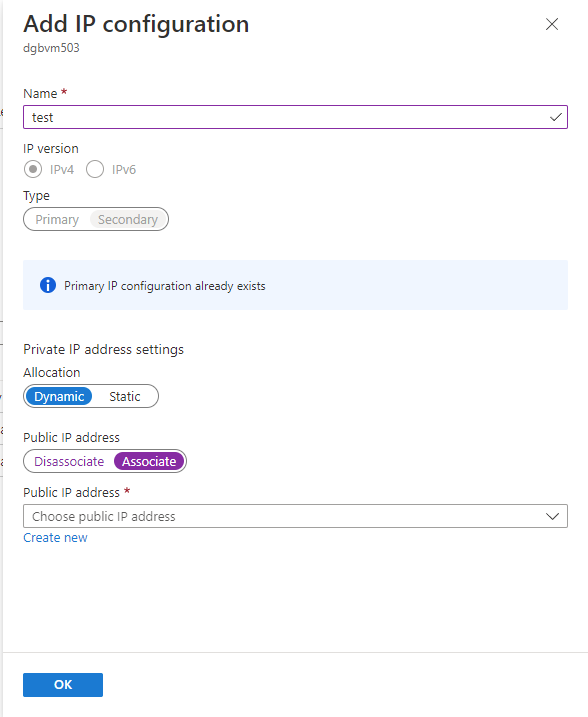
Azure - Additional Public IP
Third Image, of Add IP Configuration:
Azure - Public IP Configuration
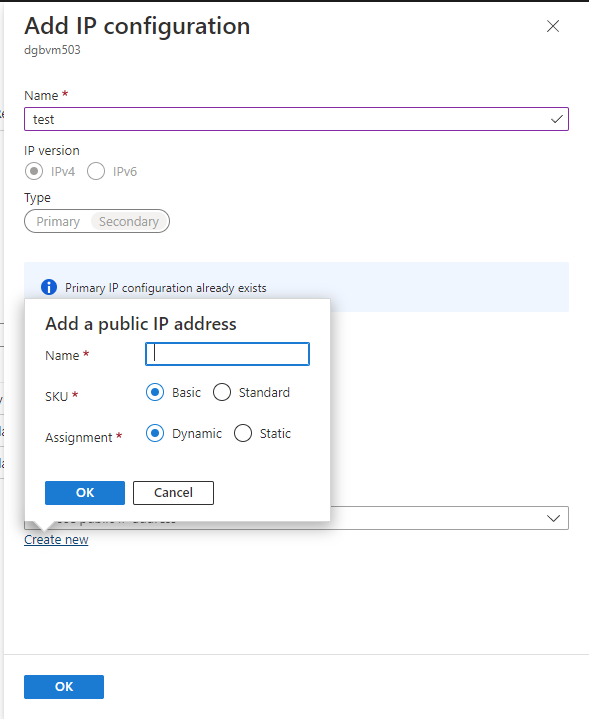
Okay, don't be confused, these three images above simply show the steps involved to get where you need to be. The first of the three images is the initial screen which will appear after having selected Add.
In the "Name *" textbox just provide a name (anything will do), which will become the name for this IP configuration (not the name for the IP, but the configuration). You may wish to call it something like ipconfig2, for example.
Then, where you see the option for Disassociate and Associate click on Associate. When you click on Associate it will then provide you with an additional option, which otherwise isn't visible, to create a new IP.
Now you can click on the Create new link which is displayed, and a little pop-up box will appear. Enter a name in the Name field - again, this can be anything you want; this name is the name you're giving to the IP address itself (recall, above, we already gave a name to the IP configuration, but this is for the address itself). An example name: myip2
Depending on your unique needs, the other options may vary for you, but a simple off-the-shelf choice would be to select SKU = Basic, and Assignment = Static.
Note: Regardless of anything, the new public IP address will have a local IP address linked to it (such as in the form of 10.0.0.3, for example). The Private IP address settings (just above the Public IP address settings) determine whether the system allocates this address, or whether you determine it. You will use this local address later on to create an ethernet alias and also in your Apache configuration file. Thus, in the Private IP address settings you may be wise to choose an allocation of Static. Your Primary IP address for the VM (i.e. the public address you already have) will already display a local IP address next to it (on the IP Configurations screen); you may simply wish to choose the next available address in the same range. (e.g. if your Primary IP address is associated with 10.0.0.2, then you might want to choose 10.0.0.3 to associate with your new public IP).
Click on OK to save the configuration.
Alright, you should have now successfully created a new public IP address, given it a name, and have a local IP address associated with it. Remember, when you're configuring Apache (or Nginx, or whatever your server), you'll not be directly associating your website with the new public IP; you'll be associating it with the local IP, so make a note of the local IP which is linked to the new public IP address.
Stage 2
After having created the new IP address and assigned it to the VM instance we now have some additional steps to do, to get the address working with your website. These steps include:
- Checking what network interfaces are already running
- Create a new ethernet alias
- Start up the new alias
- Make sure the new interface is active
- Modify your webserver config file(s) so that it handles the new address
So, the first of those steps simply involves running the command ifconfig from your Linux command line. You should see something like the following:
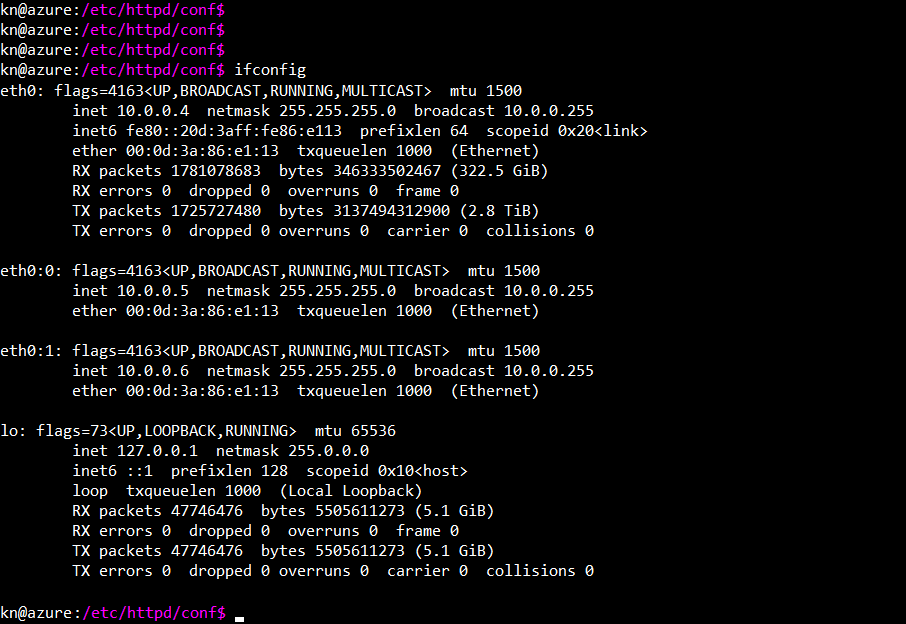
Run ifconfig at the command prompt
Note, in this particular case, the eth0:, eth0:0: and eth0:1: lines, and note the local IP addresses associated with each. That is, see that 10.0.0.4 is associated with eth0, while eth0:0 is associated with 10.0.0.5, and eth0:1 is associated with 10.0.0.6.
In your own case you may just see the eth0 configuration, if you have just a single existing public IP address set up on your machine.
You're now going to need to create/edit a file such that you can add a new ethernet alias. On CentOS and RedHat flavors of Linux you'll find the file location at:
$ /etc/sysconfig/network-scripts/
Other versions of Linux may have the file(s) in a different location.
Now, be careful. cd into the above directory, and you should see something along the lines of what is displayed in the image below:
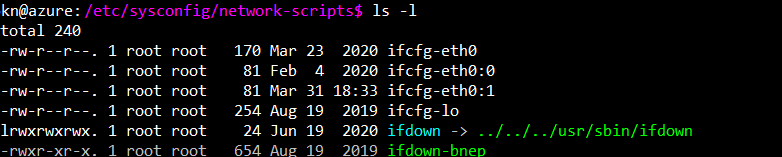
Linux command line interface
Depending on your existing set up, ifcfg-eth0:0 and ifcfg-eth0:1 may not exist. Basically, what you need to do is to create a new file based on the existing setup. In this case (i.e. the one displayed here) the new file you would create would be called ifcfg-eth0:2, or if ifcfg-eth0:2 already existed then it would be ifcfg-eth0:3. If you have only ifcfg-eth0 listed, then your new file will be ifcfg-eth0:0.
So, first of all, make sure you have a backup of whatever ifcfg files exist. Don't modify anything unless you're certain you can restore it.
Okay, so if you already have an existing alias you can just copy the existing file to the new name, and edit the contents accordingly, noting to change the local IP address (IPADDR) and the DEVICE lines. If you don't already have an existing alias, then this is what your file should look like:
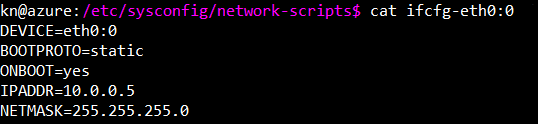
Linux command line interface
The DEVICE line will reflect what you named the file, in this case the file is ifcg-eth0:0, so our DEVICE will be eth0:0. The IPADDR line will reflect the local IP address which you noted down earlier in the process, when you set up the public IP address. Now save the file. (permissions of 644 are fine).
Nearly done!
You now need to start up the new alias you just created. Again, noting the alias name, if the alias we just created was eth0:1, for example, then the command we run (as sudo or root) would be:
$ sudo ifup eth0:1
If the alias we created was, instead, eth0:0, then the command would be:
$ sudo ifup eth0:0
Now run ifconfig again to make sure that the new interface is active. You should see additional information for the new alias displayed.
If you see the new interface active, as you should, then you're now ready to modify your web server configuration, to have the website use your new IP configuration.
Web server:
Okay, so all the hard bits are done now. All you need to do is to configure your webserver configuration file (in the case of Apache that will probably be at /etc/httpd/conf/httpd.conf).
I won't spend too much effort on explaining the configuration for httpd.conf, since I'll assume you're already familiar. However, suffice it to say that you're not going to be configuring your new public IP address - you're going to be setting it up with the local IP address which is associated with the public IP address. (i.e. the one you just created the ethernet alias for). Depending on how your DNS is set up, you'll also want to head to GoDaddy, or wherever you set up your DNS records, to point your domain to the new public IP address.
So, just briefly, assuming the local IP associated with your new public IP is 10.0.0.6 (example), and your domain is called mywebsite.com, the VirtualHost section for your httpd.conf file, could look something like the image below. (in this case I've taken the liberty of having also set up SSL, and modifying the file so that all http traffic goes to https).
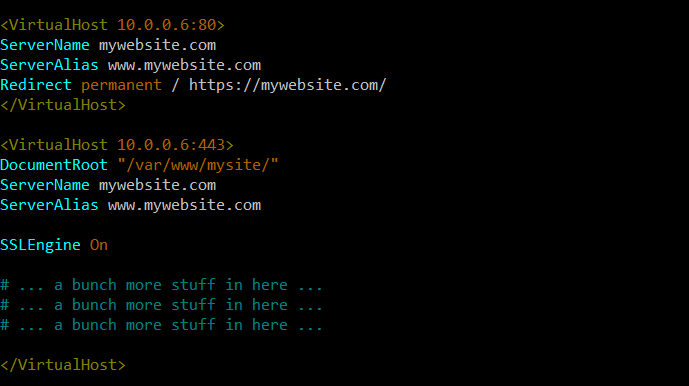
Apache Configuration
Be sure to make a backup of httpd.conf before modifying it, and also remember to restart Apache for any of the changes you make to take effect.
Hopefully the information here for adding an additional public IP on Azure was helpful to you. Thanks for reading!