
WSL2 – Add a Local SSL Certificate with mkcert
It's often useful, if not essential, when developing a project or website on a local development computer to be able to use an SSL certificate. You can then test things out with https, and get the little lock in your browser address bar. However, with the made-up domain and local IP address of your local development machine, you can't simply use something like LetsEncrypt. While LetsEncrypt works extremely well for public sites (and it's free!), it won't work for local URIs. This is where mkcert comes in very useful. Using an instance of Ubuntu on WSL2 and Windows 10, this article explains how to add a local SSL certificate.
Article Overview
This article will explain how to add a local SSL certificate such that a local website or resource may be accessed from your WSL2 environment using https. The examples use Windows 10 and a Ubuntu instance in WSL2, but the same methods should almost certainly work for WSL (i.e. the version prior to WSL2) and other versions of Linux (tweaking the Linux commands where necessary for your flavor of Linux). These instructions are untested on Windows 11, but there's no reason to suppose the same methods won't work.
What is mkcert?
mkcert is, as described on its github page, "A simple zero-configuration tool to make locally trusted development certificates with any names you'd like." Its author is Filippo Valsorda, and the software is free. It's also very simple to use, and absolutely fabulous!
It's quite possible that you've already seen the mkcert page, followed the instructions, and then wondered why your SSL certificate doesn't seem to be working with your WSL2 website, even though the process went flawlessly. However, if you're using WSL/WSL2 you need to do an extra couple of things. It's all simple enough though.
Instructions for Adding a Local SSL Certificate for WSL2
First of all, you need to install mkcert on your WSL/WSL2 Linux installation. Depending on your flavor of Linux these instructions may differ slightly.
Ubuntu: $ sudo apt install libnss3-tools

CentOS/Fedora: $ sudo yum install nss-tools

Arch Linux: $ sudo pacman -S nss

Suse Linux: $ sudo zypper install mozilla-nss-tools
The above commands may take a minute or two to complete, depending on your system and connectivity.
You can then go ahead and install mkcert itself, using Homebrew, which should already now be installed, as part of the previous downloads:
$ brew install mkcert
Or, if you prefer, there are instructions for building from source, or using the pre-built binaries at the mkcert github page.
If everything has completed successfully so far, you should now have mkcert installed in your Linux WSL2 instance. Great!
You now need to run the following command in WSL/WSL2:
$ mkcert -install
If you're wondering where everything was installed, then (on Ubuntu at least) you can probably find it all in: /home/linuxbrew/.linuxbrew/bin/
Stage 2
The instructions provided on the main mkcert page, for creating the actual local SSL certificate, will usually work just fine, but if you're trying to get things working with WSL2 then you firstly need to do a couple of other bits.
So, first things first. Cast aside your WSL window for a couple of minutes and we'll do some bits and pieces in Windows.
Firstly you need to open up PowerShell (not a cmd window), and you need to open it with administrative privileges. If you're not sure how to do that, then search/find Powershell from your Start menu or by typing in "powershell" at the magnifying-glass search box, and then right-click the PowerShell listing, and select Run as administrator.
If you don't already have Chocolatey installed then you'll need to install it. You may want to read the full instructions at the chocolatey install page, or see if the abbreviated instructions below work for you.
If you already have Chocolatey installed then you can skip the "Installing Chocolatey" instructions, and go straight to the "Install mkcert on Windows" section below. If you're not sure whether Chocolatey is installed or not, you can check by typing choco at your PowerShell prompt. If it's installed it will display the version number.
Installing Chocolatey:
Okay, evidently if you're reading this portion then you don't already have Chocolatey installed, so here goes:
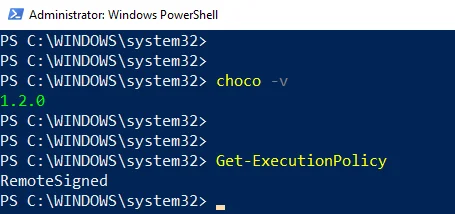
PowerShell, checking Get-ExecutionPolicy
You first need to make sure that Get-ExecutionPolicy is not Restricted. The Chocolately website suggests using Bypass to bypass the policy to get things installed or AllSigned for additional security.
So, to check that, you should enter Get-ExecutionPolicy at your PowerShell prompt. If it returns Restricted, then either enter Set-ExecutionPolicy AllSigned or Set-ExecutionPolicy Bypass -Scope Process.
Assuming you're content with things so far, then you can now go ahead and install Chocolatey, using the following command at the PowerShell prompt:
Set-ExecutionPolicy Bypass -Scope Process -Force; [System.Net.ServicePointManager]::SecurityProtocol = [System.Net.ServicePointManager]::SecurityProtocol -bor 3072; iex ((New-Object System.Net.WebClient).DownloadString('https://community.chocolatey.org/install.ps1'))Just copy/paste the above command at your PowerShell prompt. After a short time, and after a stream of installation information has appeared, you should then be able to verify that Chocolatey is installed by typing in choco -v (or, actually, just choco).
If the above command didn't work then, possibly with the progress of time, the parameters may have changed since this article was posted, so you may want to refer to the official Chocolatey installation instructions.
Now you'll need to install mkcert in PowerShell.
Install mkcert on Windows
This bit is easy! All you need to do, now that Chocolatey is installed, is to enter the following command in PowerShell:
choco install mkcert
and then:
mkcert -install
Assuming the above completed successfully, we now want to know the location of where the CA certificate and key storage was created. To do that, simply enter in PowerShell:
mkcert -CAROOT

mkcert -CAROOT
You'll hopefully see something similar to the image here, where the CAROOT (i.e. Certificate Authority Root) is printed as: C:\Users\DSB\AppData\Local\mkcert.
If you've gotten this far without any hassles then everything is on track. If you navigate to the folder/directory provided by the mkcert -CAROOT command you should see a couple of files in there. These will most likely be named "rootCA.pem" and "rootCA-key.pem". Remember where these are.
Back to WSL2 ...
Okay, back to your WSL/WSL2 window, and navigate to the location of your mkcert installation. As noted earlier, on our Ubuntu installation this was at /home/linuxbrew/.linuxbrew/bin/, but this may vary according to your flavour/installation.
So, you should now be at a prompt in your WSL window in the location of where mkcert is installed. There are no doubt other methods of achieving the same goal, but this way is simple and easy to follow. Enter the following command, as you did in PowerShell:
$ ./mkcert -CAROOT
You should get a response which is something like: /home/dsb/.local/share/mkcert
Remember those two files in Windows from earlier ("rootCA.pem" and "rootCA-key.pem")? Those two files you now need to copy to the CAROOT location on WSL, overwriting any other files with the same name. (if you can't overwrite because of permissions, then just rename or delete the WSL files you're trying to overwrite, from within WSL).
So, copy those two "rootCA" files from Windows into the CAROOT location in WSL. If you're wondering how to do that, an easy way is just to find the location of your WSL files in Windows and copy from one location to another using Windows Explorer (aka "File Explorer").
This naturally cues the question from some, "how do I find the location of my WSL files in Windows?". Here's an easy way. Just type \\wsl$ into the File Explorer address bar, and you should see your WSL Linux instance listed there. Click on that and navigate to your WSL CAROOT location.
If you're at this point, you should now have copied the two rootCA files from Windows into your CAROOT location in WSL/WSL2. Excellent!
Creating the Local SSL Certificate
This is pretty much the last step you need to do in creating your local SSL certificates. Other than this, you'll just need to configure your webserver (some instructions for Apache are provided further down) and then restart your webserver.
So, first of all, carefully consider the names for which you want the certificate. And, yes, you can have wildcard names too (but, to my knowledge, possibly only one level deep).
You can see some examples of how to do this by opening up PowerShell (or in WSL) and entering mkcert -h. Additional topics can be seen with mkcert -help.
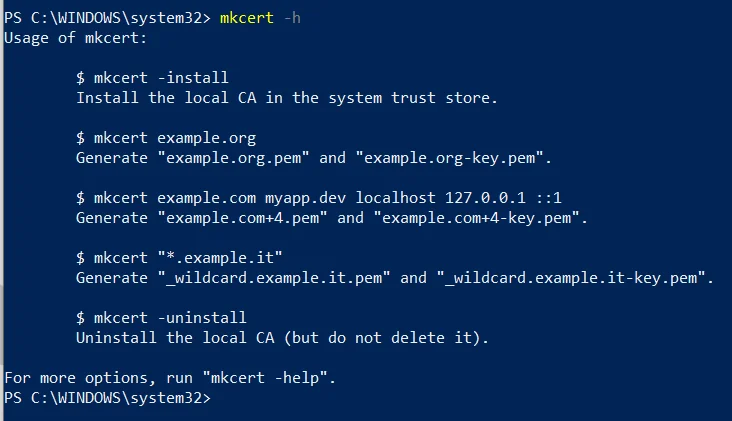
mkcert -h in PowerShell
However, back to WSL and, for the sake of simplicity, we'll just assume some fairly straightforward requirement. Below is the command to create the certificate for mysite1.com, *.mysite2.com (the asterisk is, of course, the wildcard character), localhost, the 127.0.0.1 loopback address and the IPv6 condensed-format loopback address.
$ ./mkcert mysite.com "*.mysite2.com" localhost 127.0.0.1 ::1
So, navigate to the WSL directory where mkcert is, if you're not already there, and enter the above command. As per the image above, so long as the command executed successfully, it should return the names of two new ".pem" files.
If you have no errors then you should be all set. You should be able to see the two new files in the same directory as which you executed the command.
Now what remains is to configure your webserver (e.g. Apache, Nginx, etc.) to use SSL.
Configuring Apache
To get Apache to work with SSL you'll need to use the SSLEngine on directive, as outlined below. It would be nice if you could just tweak your .htaccess file to do this, but it won't work. You'll need to edit your Apache config file.
To clarify, you may use the SSLEngine directive in server configuration context, or in VirtualHost context, but not in .htaccess and not in Directory context either. An example is a little further down.
Step 1
First, however, we're going to create a directory on WSL just for the certificates. This can be anything you want, so long as Apache can read it. For example, you might want to create a directory such as /var/www/certs/.
Now copy the two files which were just created (the two new .pem files) into your /var/www/certs/ directory (or whatever you decided to call it).
Step 2
Now we'll edit the Apache configuration. Depending on your system and version of Apache, the location and name of these files may vary, but we'll be editing the VirtualHost section. Hopefully you know how and where to locate the files.
On Ubuntu it is likely one of the config files in: /etc/apache2/
On CentOS the Apache config location is probably: /etc/httpd/conf/
On the Ubuntu system I tested, the Apache virtual hosts file is at /etc/apache2/sites-available/ .
So, recalling that the SSLEngine directive cannot be used in a Directory context, and noting that we copied our certificates to /var/www/certs/, here's the code we needed to add to the VirtualHosts section of our site.
SSLEngine On
SSLCertificateFile /var/www/certs/mysite.dsb+4.pem
SSLCertificateKeyFile /var/www/certs/mysite.dsb+4-key.pem
You'll see that our particular certificate files are named mysite.dsb+4.pem and mysite.dsb+4-key.pem.
However, if you simply paste the code into your existing VirtualHost (which is likely listening on port 80) then it won't get the results you want. You want your sites to be listening on port 443. Additionally, if you simply change the port for your VirtualHost from 80 to 443, that means that any existing http links (as opposed to https links) won't work.
Here's a better way. Permanently redirect your VirtualHost's port 80 traffic to another VirtualHost listening on port 443. See below.
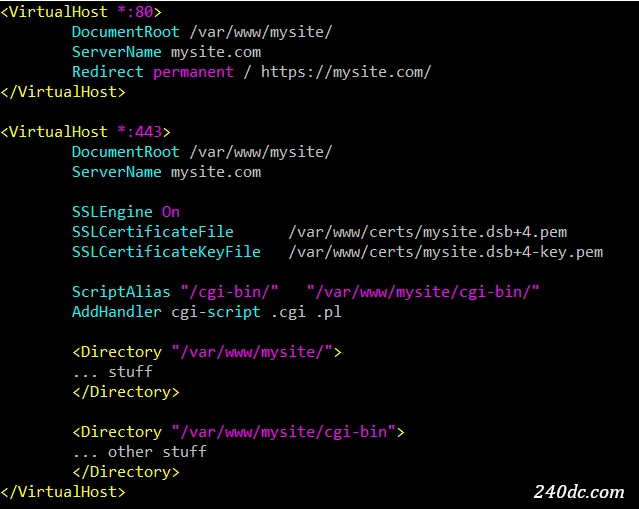
Apache VirtualHost Configuration
Step 3
So long as everything is configured correctly, you should now be ready to restart your webserver! Naturally this command will vary according to the OS you're running in WSL, etc., but the syntax is likely similar to the commands given here:
Ubuntu: sudo service apache2 restart
CentOS: sudo systemctl restart httpd.service
You can check the syntax of your configuration (this is on Ubuntu), before restarting the webserver, with:
$ apache2ctl configtest
If you configured your VirtualHost as indicated above, once you've restarted the webserver you should be able to navigate to your site with either http or https. Any requests to http will automatically be forwarded to https, and you should be able to see the little lock in your browser bar.
Problems?
If, upon trying to restart the webserver on Ubuntu or Debian, you get a message like "Invalid command 'SSLEngine', perhaps misspelled or defined by a module not included in the server configuration", you may be able to resolve this with the following command, and trying to restart the webserver:
$ sudo a2enmod ssl
With CentOS, the same error can be resolved with:
$ sudo yum install mod_ssl openssh
If you have any problems with the certificate not being recognized, you may want to test your site in different browsers, just to see if the problem is related to a specific browser. However, all the major browsers should work with your local SSL certificate without issues.
Finally ...
Hopefully you won't get any problems, but if you do then you might want to visit the mkcert github page, where you may well find additional information.
I hope you found the information in this article useful. Thanks for reading!