
GIMP – How to Resize Images / Canvas / Layers
Knowing how to resize images in GIMP, and resizing the canvas and various layers, is one of the most basic skills you need for image manipulation. It's not difficult to learn these skills, and once you've done it a few times it becomes second-nature. However, if you're new to image-editing, or specifically to GIMP, then you may need a gentle pointer in the right direction. That's what this article hopes to achieve!
If you prefer to watch and listen. rather than read, the video below will demonstrate how to accomplish all of the same things as this article. You may find it useful to watch.
Resizing Images in GIMP - How to Resize Images / Canvas / Layers
So, there are really just a few basic things to know about resizing images. How to resize the canvas; and how to scale images and layers. These are all quite straightforward things to do.
How to resize the canvas
Think of the canvas as the physical workspace dimensions your image has available. On the canvas you create layers, and often multiple layers, and all of this you’ll eventually save as your image. Just like with a painting, the canvas is the maximum area you can paint on. So, if you create a new image which has a width of 500 pixels and a 250 pixel height, that’s the size of your canvas.
You may have a much bigger or smaller image, in which case you may need to either zoom in or out in order to work with it properly. But zooming in or out doesn’t change the actual size of the canvas; zooming in/out just makes an image easier to work with.
There are shortcut keys for zooming in and out, or you can choose to do it from the View menu if you prefer. The image provided shows the various shortcuts for zooming in and out of an image.
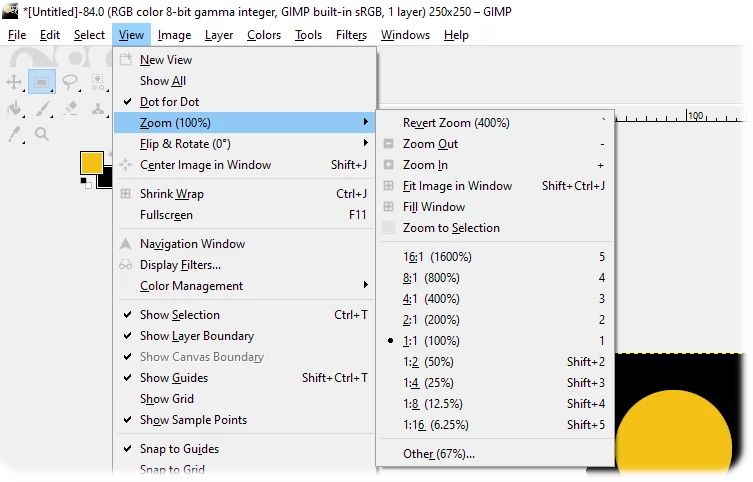
GIMP shortcut keys for zooming in and out
However, as noted earlier, zooming in or out doesn't change the size of the canvas; it simply makes working with an image easier; the image still consumes the same number of pixels - it just looks bigger or smaller.
Changing the Canvas Size
GIMP Resize Canvas
So, oftentimes, in order to make the image physically bigger (i.e. to give the image more real-estate), you need to enlarge the canvas itself. This is done by going to the menu, and under Image, you'll have the Canvas Size option.
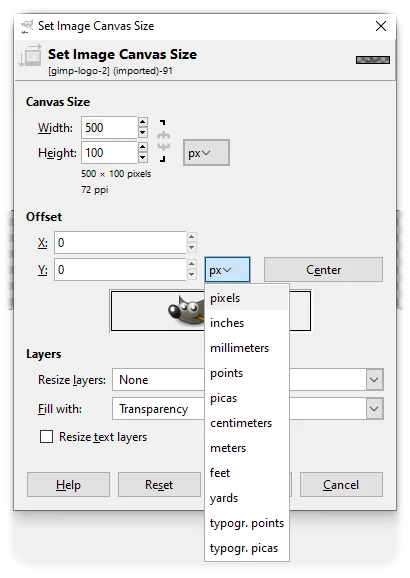
Clicking on Canvas Size will then display these options (see image), which allow you to fine-tune how you resize the canvas. You can choose the units of measurement; how to align the content which is already on the canvas, and how to handle the background of the extra piece of canvas you’re creating. The numbers you see here are the current width and height of the image. You can define these in pixels, or inches, or centimeters, or any number of other options.
The default measurement units are pixels, and you can simply enter the numbers for the new size canvas you require, or use the up/down arrows to enlarge or reduce. Then, if you wanted, you could change the position of the existing image-content relative to the new canvas size. So, for instance, adjusting the x and y offsets, you can see how the existing content of the image moves left or right, and up or down relative to the new bigger canvas. Or you can just click on the Center button, to align everything right in the middle.
There are also a couple of other options for layers displayed at the bottom of the options. The defaults are “none” for Resize Layers, and Transparency for the “Fill with” option. If you now click on Resize you'll see the canvas has become bigger (that is if you increased the canvas size rather than reduced it), and the extra canvas has a checkered background. The checkered background means it’s transparent.
The transparent background is perfect for many requirements, but if you want the whole image to have the same background color, simply choose the current background color as the “Fill with” option.
Depending on the layers your image has, if you resize the canvas and select Resize all Layers, you could also create the same background color for the entire canvas. Experiment! There are several interesting options available for your creative spirit to investigate!
In a similar manner, you could also reduce the size of a canvas too. Simply enter a width and height which is smaller than the size of the current image.
GIMP - Scaling Images

GIMP - Scale Image
Just supposing you want to magnify or reduce the scale of the image though. To do that we use the Scale Image menu option, under the Image menu item. Unlike with enlarging or reducing the canvas size, which doesn't affect the size of the existing layers, scaling an image does so.
For the most basic use, you probably don’t need to worry about the X and Y resolution here; those refer to the number of pixels per inch, or per whatever measurement scale you’re using. The defaults are fine for most things. Obviously the greater the resolution then the bigger ("heavier") the image will be when you save it.
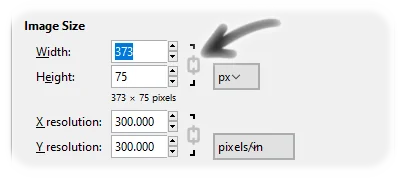
GIMP. The link/unlink symbol is indicated
So, all you need to do is to enter the new size you want for the image, and your image content will scale accordingly. By default, the width and height scales are linked, so you’ll maintain the same ratio of width to height, when you scale the image. If you wanted to unlink the width and height ratio, you can just click on the little link symbol, and enter separate numbers for each. Usually you’ll probably want to keep them linked though.
If you keep the width and height linked, which is the default, and then enter a new width, you’ll see the numbers in the height box automatically update when you tab away from the box. Then just click on Scale. And this time, unlike when you changed the canvas size, you can see that the image content has also increased in size. And you can do the same to make it smaller too.
Scaling Layers in GIMP
More often than not, you may be working with multiple layers on the same image, and if you scale the entire image, then it may not really be exactly what you need. In that instance you may just want to scale a specific layer of the image instead. So, to do that, rather than use the Scale Image tool from the Image menu, you can use the Scale Layer option from the Layer menu. This is essentially the same tool as before, except it works on layers, and you don’t have the option for X and Y resolution.
Well, those are the basics of how to resize images in GIMP. I hope you found some of those bits and pieces useful. If you found the video useful, we do have a few other GIMP tutorial videos on our YouTube channel, so feel free to check those out.
Thanks for reading and/or watching!