
HitFilm Express – How to Add Scrolling Credits
So, your amazing movie is nearly finished, and naturally it will win lots of plaudits for excellence, and maybe even awards. But one thing remains; because you're a decent guy/gal and a class act, you need to give credit to all of the talented people and resources that helped your movie come together. Cue HitFilm scrolling credits! Any professional production makes sure to give credit where it's due, and we'll show you exactly how to do that using scrolling credits.
The article below goes over the steps you need to take to add scrolling credits in HitFilm Express. However, in all honesty, you'll probably be able to visualize and understand the process much better by watching our video, above. The same video can be found here on YouTube.
Adding credits is, well, just a professional and classy thing to do. Whether you've simply used images from a free image library, or music from somewhere, or cited research or materials from elsewhere, ultimately someone else spent time and effort creating them, and giving them credit is just a decent thing to do. Additionally, although not every free resource requires attribution, many do, so it's also just a good practice to adopt if you can.
First things First ...
If you want to see an example of the type of scrolling credits we're creating here, our short Ocean Sheep movie uses the same process. (links open in a new tab/window)
If you did watch the video, while you may not yet be convinced of ocean-dwelling sheep, hopefully you noted the credits at the end (around 17:40). These included credits for still photography from some of the free image-stock libraries (most of which didn't actually require attribution), attribution for the musical elements of the video, references to Wikipedia for images used under the Creative Commons licensing protocol, credits for video footage, and one or two others as well. A text version of these same credits can be seen here.
Inside HitFilm Express ...
Now, engaging your imagination for a moment, and imagining the following image is actually scrolling at the end of a movie, it identifies the terms which we'll refer to in HitFilm (these are the same terms as HitFilm itself uses).
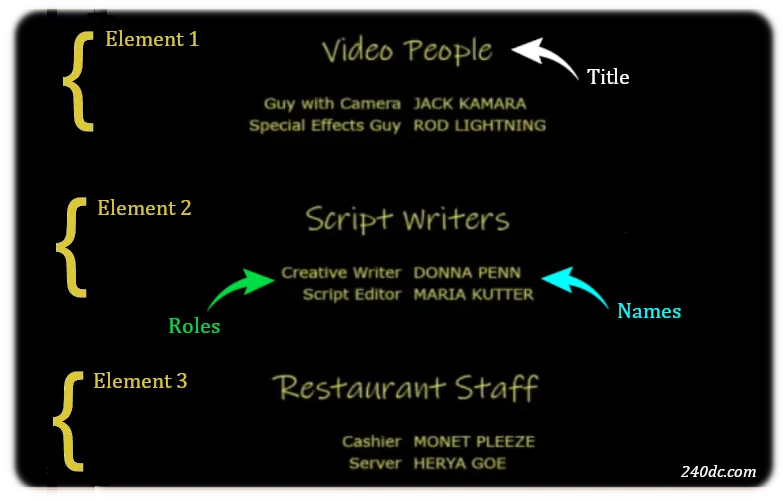
HitFilm Express Scrolling Credits
Now, before we start, I want to point out something with the credits, and that is that you should think of these items in four different parts. As you can see, we have three different sections in the credits – Video People, Script Writers, and Restaurant Staff. In HitFilm each of these sections is known as an Element, and you can have as many elements as you want. So, in this screenshot of the movie credits we have three elements, as labelled.
Secondly, Video People, Script Writers, and Restaurant Staff are referred to as Titles, and we can modify the font and font size, etc. as we wish.
Thirdly, you can think of the part beneath the titles as two columns. In the left column you have the Role of the person, and in the right-hand column you have the Names which correspond to the role. And, sensibly enough, those are also referred to as Names in HitFilm. Again, we can modify the font and font size, and some other things as we need to.
So, you have elements, titles, roles, and names. Okay, so let’s dive in and show you how to do this!
First Steps ...

HitFilm Express, New Plane
First of all, as an example project, just create a new plane in HitFilm Express. For this example keep the black background color if that's the default.
Now, you can either use the Effects menu, or you can just search the Effects Panel for what we need. If you use the Effects Panel, just search for Credits. You should now see End Credits Crawl as one of the options.
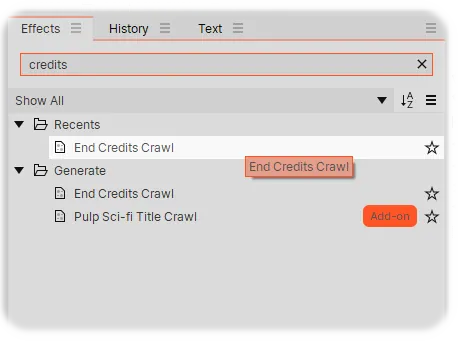
HitFilm Express End-Credits Crawl
So just drag that effect onto your newly-created plane, and you should then see End Credits Crawl appear in your Controls tab.
I should note that the End Credits Crawl (which we're using to create the scrolling credits) is a free option within HitFilm Express, so there's no need to pay for add-ons or anything like that. Everything you need is already enabled by default.
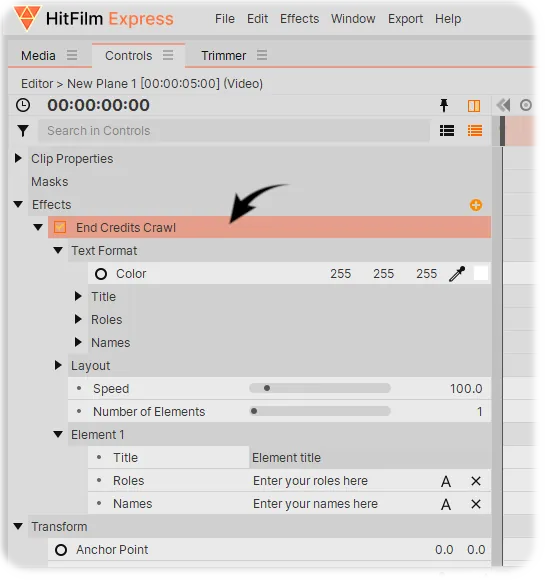
HitFilm Express Control Panel
So, having identified the End Credits Crawl in your Control Panel, under Text Format you can adjust the color, the font, and the font size, of your titles, roles and names. You can also force uppercase lettering for each of those as well. By default, the Names are in capital letters, so if you don’t like that you can always turn it off.
Under Layout you can change things like line-height and horizontal spacing. You can also adjust the gap between the roles column and the names column if you want to. You can change the speed of the credits too, and this is where you also define how many elements you need to use. You’ll recall in the still image provided earlier we used three elements in the example, but by default it’s set to one. (directly above the "Element 1" label you'll see a slider identified with "Number of Elements": simply slide the bar along to create however many elements you need).
Defining End-Credits Crawl Options
So, for this demo, we’ll just have two elements, so go ahead and change the Number of Elements accordingly, to two elements. You can use the slider to do that, or just type it in. If you add too many elements by mistake, then just change the number to however many you want, and the highest numbered elements will be removed.
Alright, so you now have your two elements, and you can just go ahead and enter the information you'd like to display. So, let’s click on Element 1.
You should be able to see that you now have the Title, Roles and Names that you can play with. First of all enter the title. So, that could be something like Lighting Effects, or Stage Management, or something similar. And then you have Roles and Names. You can just click on the letter A icon (as indicated with the black arrow in the image) to enter your roles, or if you already had something in there that you wished to clear, you could just click on the X to delete it.

HitFilm Express, adding Scrolling Credits
You'll then get a little box appear. And this is why I mentioned earlier to think of the roles and names as two columns. So, what you enter in this box (as indicated in the image) will appear in the left-hand column, and what you enter under Names will be in the right-hand column. Remember, roles are displayed on the left, names are on the right. So let’s imagine we have three roles for lighting people:
Enter the roles on separate lines as shown in the image above:
Lighting Supervisor
Bulb Checker
Lighting Effects Guy
… and then simply click on OK.
Then just repeat the same process for Names. Click on the letter A icon in the Names row and you'll get a similar little box appear. Then enter the names which correspond to the roles. The first name you enter will correspond to the role of Lighting Supervisor, the second name will correspond to Bulb Checker, and so on.
You should now have entered the Title, Roles and Names for your first element!
Don't get too excited, but you should now be able to play your video and see the effects of your amazing scrolling credits. No doubt your first reaction will be underwhelming. Without playing around with the fonts, letter spacing, font-size, colors, speed, etc., your first impression may be slight disappointment. However, there are so many ways that you can tweak the way that your scrolling credits appear, that you'll soon figure out exactly the right settings for your particular needs.
If you followed the instructions to the letter, then you'll also have a second element to play around with, so maybe try and create another group of people or resources for which to display credits.
Much like many things, the best way to learn is just play around with the various settings and see what works for you! Once you’ve done it a couple of times you’ll easily remember how to do everything.
Good luck with your video-making. I hope you found the information provided useful.